Sunday, July 31, 2016

Easy Peasy Corner Critter Bookmarks


Hi everyone!  I'm here today with a super quick craft that you can do with or for your kids! With the start of school approaching,  I thought they might enjoy having a fun bookmark or two to get them excited about reading!  (Even though my homeschooling days are long over, I guess I'm still a homeschool mom at heart!) 

These are really quick and easy to make (especially if you use thin origami paper rather than heavier designer paper) and they're as cute as can be.  You can come up with all sorts of ideas for critters, and make them as simple or as ornate as you like!  They would even be a fun make-and-take party favor.  


First up is a quirky bat with big wings, little ears, and fangs.  His eyes are the smaller sized eye brads that come 12 to a pack in two sizes.  I attached them before making the final folds, so the ends are enclosed and won't get in the way as the bookmark moves on and off the page.  I kept my design super simple, but if you were making this for an older child you could bling it up with some sticky-backed pearl strips to accent the folds of the wings.


Next up is a frog.  A couple of circle dies or punches really make the larger sized eye brads stand out on the printed paper.  Again, the ends of the brads are enclosed to keep the inside smooth and to hopefully also discourage tiny fingers from fiddling with them!

You can find the video tutorial for folding the origami shape here and more ideas for cute critters here.   Have fun, and have a great school year!

Saturday, July 30, 2016

Just Keep Smiling....

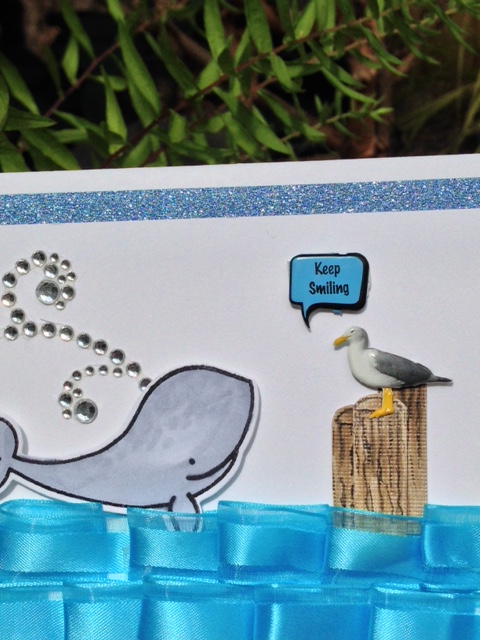
Hello everyone, we recently saw "Finding Dory" and I was totally enchanted and inspired by this movie and created a card using elements from Eyelet Outlet and from a "Avery Elle" stamp set.

IMG_0912.JPG

I stamped the whale, cut him out and colored him with my Copic Markers. For the glittery frame I used strips of dark blue glitter washi tape on a piece of scrap card stock.  I created the piers by hand cutting brown paper and then drawing on the wood grain. As added embellishments, I used the Seagull Brads, and the Spring Bubble brads that say "Keep Smiling" (which reminded me of the saying that Dori would often say "Just keep swimming, just keep swimming...") and then added Clear Swirl Bling as the water spout from the whale all from Eyelet Outlet.

IMG_0915.JPG

 As a fun, interesting and creative way to make the ocean waves I took some left over blue ribbon and looped it around and stuck it down with double sided tape!  Easy.  I hope you like my "Finding Dory" inspired card that reminds us to just keep smiling.  Thank you for finding me today and remember to just keep swimming, just keep swimming...


Friday, July 29, 2016

Birthday Envelopes!


When you are older...and it is your birthday,
you might get gift cards instead of actual birthday gifts.
So..jazz up the little piece of plastic with a fun envelope card!

(At least this is what happened to my husband earlier this week!)


With plenty of room to decorate,
you have a pocket to place a small note card and the gift card.
Simple take an A2 envelope and seal it up. Slice off about 1.25 - 2 inches. 
Use your paper crimper to crimp the bottom portion. The, like magic...
the part you sliced off becomes the "lid."

Supplies from the Eyelet Outlet:


Supplies from the Eyelet Outlet:

I bet these would look great for Christmas too!!


Thanks so much for stopping by!
My bday is NEXT WEEK!

Dawn Mercedes, of Sunnyside Up

Thursday, July 28, 2016

Lancaster, PA


This weekend, we are headed to Lancaster, PA!!


Come check out our new Flat Back Resin!
These are great for scrapbooks and cards...but also sewing projects and DIY projects.
We can't wait to see you!!


So much more to choose from...
with GREAT prices too!!


Wednesday, July 27, 2016

Christmas in July

Those of you who follow my blog know that I make Christmas cards all year long.

I love that I never have to put away my favorite Christmas products ... and I love that when November comes to a close, I have lots of one-of-a-kind Christmas cards to send across the miles.

I also love that a Santa Hat can turn almost any creature into a Christmas icon ... even a skunk.


For my focal image, I combined the cute little skunk from the Woodland Animal Brads with a Santa Hat Brad ... isn't he adorable.


I used Green Glitter Washi Tape on Holiday paper to create the starburst for this week's Retro Sketch.  I added multi-size black pearls to accent my little skunk and a sentiment sticker from SRM Stickers.

Here's a close-up of this cute little Christmas Critter.


Of course I couldn't stop with the Skunk ... I had to make a card featuring his friend the Raccoon.


This layout is from The Paper Players and features more SRM Stickers and multi-sized Adhesive Pearls.

Here's another view of this cute little guy.


Remember, it's never too late to start taking back your December one holiday card at a time.


Products used
Have you followed Eyelet Outlet on Twitter yet?  How about Facebook?


You can visit me in blogland at Ingenious Inkling

Monday, July 25, 2016

A Banner Day

Hi guys, Lauren here with a shocking true confession: I have a serious obsession with washi tape... and no intention at all of doing anything about it... except enlarging my collection and making more washi-adorned craft items. Luckily, Eyelet Outlet is here to help me in this quest. Have you seen how many different varieties of tape they stock?? It's a washi-lover's dream! Here's a card that uses two of them: Pink Flower Washi and Foil Pink Dots Tape.


Did you know Eyelet Outlet has ribbon, as well? This Fruit Ribbon is one of my all-time faves. It's so summery, don't you think? But there's nothing quite as summery as a Flamingo Flatback Resin, so I had to add one of those to my card, too. It's nestled on a few Solid Color Paper Flowers, just to be cozy.


Do you love cards with banners as much as I do? There are loads of ways to make them, but imo, washi tape is hard to beat, since you can fold it right over a piece of twine and it's self adhesive! I've used the Pink Flower Washi again in just that way on this card, as well as a few happy little clouds cut from a Cloud Tape that is, alas, out of stock in the online store... but provides you with another reason to always check the Eyelet Outlet booth at your next trade show, because there are sometimes exclusive goodies! ;)


Of course with all these wonderful new products we sometimes lose track of the fact that Eyelet Outlet's first name is EYELET... and those things are still as much fun to use as the very first time I saw them being set (with a hammer!) at my LSS, years ago. I've used the good old 5mm Round Assorted Colors Pack to secure the twine between my pennants as well as to dot the "I" in "Hi".


I hope you're already having a "Banner Day" but if not, there's still time to make some cards, which will definitely cheer you up! ♥

Hi, I'm Lauren
My giant tape collection and I can be found on my blog most days... 
stop by for a visit!

Sunday, July 24, 2016

Altered Dessert Tray for 50th Anniversary w/ Video Tutorial

My in-laws have their 50th wedding anniversary this summer and for the little party we had I made them a dessert try all decked out in the colors of their wedding - ice blue!


Here is a full video tutorial for how to made this fun anniversary dessert stand.


Here are some up close shots of the Deflecto 3 Tier Stand.


I added in some fun blue glitter washi tape and some pretty gems all from Eyelet Outlet as seen below.


Supplies Used
Washi tape - Eyelet Outlet
Gems  - Eyelet Outlet
Chipboard - Other
Paint - DecoArt
Glue - Beacon
Enjoy!

http://scraps-of-reflections.blogspot.com/
 http://scraps-of-reflections.blogspot.com/

Saturday, July 23, 2016

for you card by Marina Gridasova

hello ladies! it's Marina here again with my new clean and simple card
for you card @akonitt #eyeletoutlet #card #by_marina_gridasova
a few close ups:


 this time I decided to use a few Eyelet Outlet products without lots of layers and embellishments. You need to use one main element (I used vellum flower)  and some pearl stripes to made horizontal composition. Add the title and some dots - and your card is ready ))) Also you can see I used here 2 different glitter dots - gold and yellow

Eyelet Outlet products:
Glitter Enamel Dots Gold 
Glitter Enamel Dots Yellow   
Pearl Bling Strips White
Pearl Bling Strips - Purple

Hope you will like my card ))))


 Marina

Friday, July 22, 2016

In circle me!

Hi everyone!!

Noe here in a day of farewell because it will be my last post for Eyelet Outlet.. First of all, I wanted to thank  for giving me the opportunity to be part of this wonderful DT!! It's been a great time sharing with all of you and my great teammies... Thanks for all!!

Well, here is my last card!!
 

To make the background I used different washi tapes that  I've pasted on piece of cardstock and I cut with a circular die of different sizes ..

Then I created a frame around each circle and outlined the card with a black marker.
 

To cover the central part of my card, I used two different frames, overlapping each other to give some volume and I stamped my sentiment. In addition, to give some fun, I placed a mustache and glasses brads.
 
Finally I filled some holes with enamel dots of different colors and sizes ... I love the dots enamels !!
 

 Products used from EO Store:


Glasses Brads.- http://www.eyeletoutlet.com/glasses-brads.html
Mustache Brads .- http://www.eyeletoutlet.com/mustache-brads.html
Circle Orange / Blue .- http://www.eyeletoutlet.com/circle-washi-tape1.html
Washi Green Patern.- http://www.eyeletoutlet.com/green-washi-tape-pattern.html
Enamel Dots.- http://www.eyeletoutlet.com/enamel-dots-52ct.html
Washi Tape Arrows .- http://www.eyeletoutlet.com/arrow-washi-tape2.html

 Hope you like it!! 

It has been a pleasure to share my projects with you all! Be happy!!


Thursday, July 21, 2016

Trade Show announcement!!

This weekend, we are in Kansas City, MO!!!

Come visit our booth at 


Check out our 2016 Trade Show list for more dates and locations!

Check out these amazing cards by Designer Stephanie and Designer Lauren...
that were featured on Retro Rubber Challenge FB page.


With so many colors, styles, and designs, what will you put in your shopping cart today?


Wednesday, July 20, 2016

In Full Bloom

 Summer is in full swing...
and so are the flowers and vegetables and growth.

Here is a fun way to capture the growth of your daughter through the years 
by using school pictures...and the lovely embellishments from the Eyelet Outlet.


Supplies:
I LOVE these brads...and they are 50% off!!


This amazing laser cut layout can be found at

Time flies...
They always tell you that when you baby is young.
So..don't wait...
buzz on over to the Eyelet Outlet store and purchase flowers and bling and
immortalize your daughter...before she has one of her own!!

Thanks for visiting us today!

Dawn Mercedes, of Sunnyside Up